React Project - Idea to Production - Part Four - Hosting the Movie app and setting up CI/CD
Thu Jun 18 202015 min read
This is the last post in the series. You can find the first post here
Where are we
Ok so till now we have
- Brainstormed on our brilliant idea to build a Movie App.
- We have decided what features are needed as part of the MVP.
- Our design team has given us the wireframes.
- We have setup our project as a Monorepo.
- We have setup linting rules, code formatter and commit hooks.
- We have setup our our component library
- We added support for Typescript in our component library
- We have setup Storybook
- We added our components to the component library
- We have added unit tests for our components
- We can see our components showcased in Storybook
- We extracted our core services in
coreproject - We setup our
webappproject for the web application - We added
webpackconfigs for ourdevbuild - We developed our Web Application
- We made sure everything runs on our local development machine
What are we going to do now
So right now we have our web application running on our local system. So the next step is to host the application on a server and make sure it is accessible on the internet. We also would like to setup Continous Integration (CI) to make sure everytime some one makes any changes, everything is still working fine. And we would also like Continous Delivery (CD) to push our application to production everytime we merge new changes. We will use AWS as our cloud service. We will use Github Actions for our CI/CD pipeline.
TL;DR
This is a 4 part post
- Part One : Wireframes and Project Setup
- Part Two : Setting up a Component Library
- Part Three : Building the Movie App using component library
- Part Four: Hosting the Movie app and setting up CI/CD
Source Code is available here
Component Library Demo is available here
Movie App Demo is available here
Setting up Production Build
We already have our development server running perfectly, but we can’t publish development build to production. We will have to configure our production build.
We start by creating a separate config for production. Create a new config file webapp/config/webpack.prod.js.
What we need in our production build
- We want to
type checkour code before building (as we are usingbabel-loader, we have to dotype checkseparately). - We want
productionquality JS code - We want our chunks to be
content hashed - We want our CSS to be
minified - We would want to split our vendor files into separate chunks. (This is controversial but a very good reason for doing this is explained here).
So we end up having a prod config which looks like this
const path = require("path")
const merge = require("webpack-merge")
const webpack = require("webpack")
const TerserJSPlugin = require("terser-webpack-plugin")
const MiniCssExtractPlugin = require("mini-css-extract-plugin")
const OptimizeCSSAssetsPlugin = require("optimize-css-assets-webpack-plugin")
const ForkTsCheckerWebpackPlugin = require("fork-ts-checker-webpack-plugin")
const common = require("./webpack.common.js")

module.exports = merge(common, {
  mode: "production",
  output: {
    path: path.join(__dirname, "../dist"),
    filename: "[name].[contenthash].js",
    publicPath: "/",
  },
  plugins: [
    new ForkTsCheckerWebpackPlugin(),
    new webpack.HashedModuleIdsPlugin(), // so that file hashes don't change unexpectedly
    new MiniCssExtractPlugin({
      // Options similar to the same options in webpackOptions.output
      // all options are optional
      filename: "[name].[contenthash].css",
      chunkFilename: "[id].[contenthash].css",
      ignoreOrder: false, // Enable to remove warnings about conflicting order
    }),
  ],
  optimization: {
    minimize: true,
    minimizer: [new TerserJSPlugin({}), new OptimizeCSSAssetsPlugin({})],
    runtimeChunk: "single",
    splitChunks: {
      chunks: "all",
      maxInitialRequests: Infinity,
      minSize: 0,
      cacheGroups: {
        vendor: {
          test: /[\\/]node_modules[\\/]/,
          name(module) {
            // get the name. E.g. node_modules/packageName/not/this/part.js
            // or node_modules/packageName
            const packageName = module.context.match(
              /[\\/]node_modules[\\/](.*?)([\\/]|$)/
            )[1]

            // npm package names are URL-safe, but some servers don't like @ symbols
            return `npm.${packageName.replace("@", "")}`
          },
        },
      },
    },
  },
})
Now with our config in place, lets add our production build script.
"build:webapp:prod": "cross-env production=true webpack --config config/webpack.prod.js"Now if we run yarn build:webapp:prod we should see our compiled files under webapp/dist folder.
Preparing our Cloud Environment for hosting
Once we have our production build, there are many ways we can host our application. If you google hosting a static site there will be thousands of good ways to do it.
For our use case we will use Amazon S3 for hosting our site, and Amazon Cloudfront as our CDN.
Setting up S3
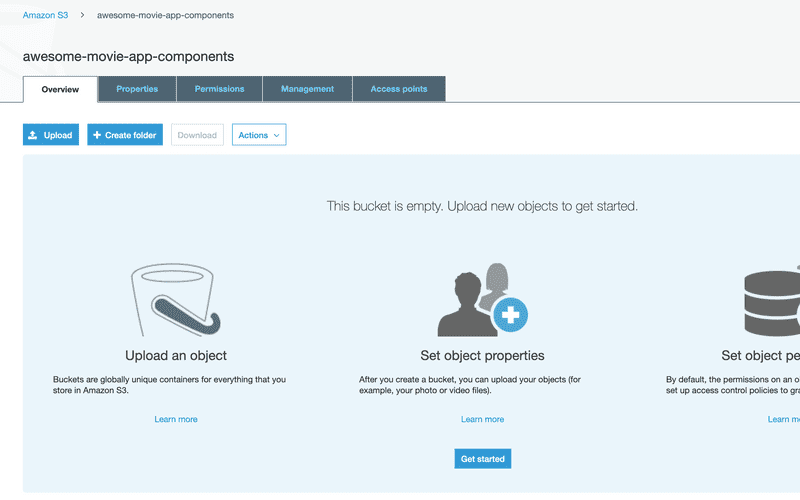
We will first setup our S3 Bucket for storybook, then we can repeat the same steps for webapp.
Create the Bucket
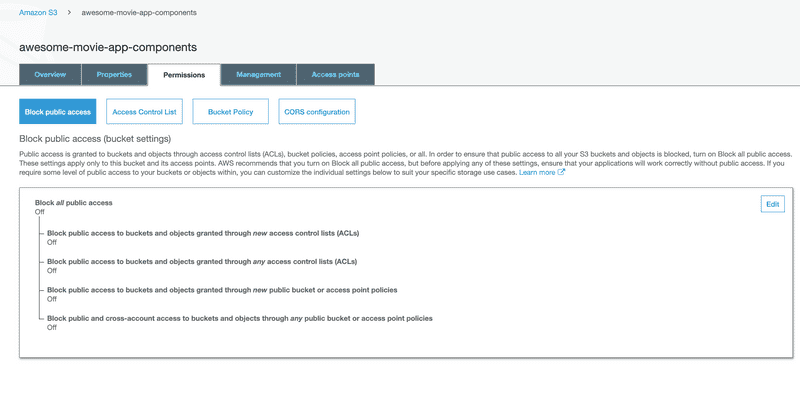
Allow Public Access
For hosting static site, people should be able to access your S3 bucket. So we need to allow public access.
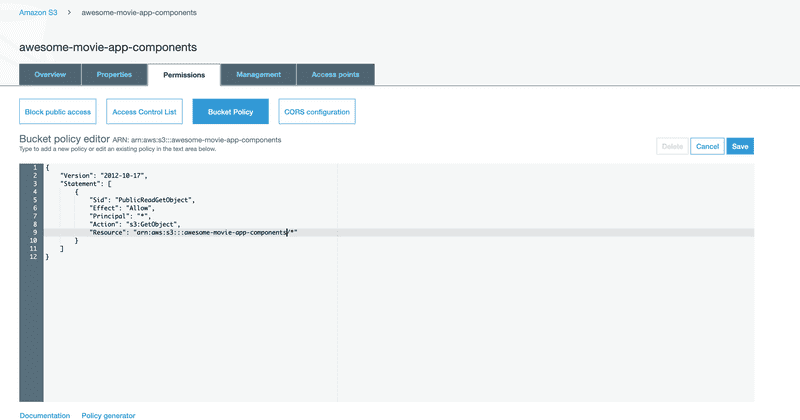
Make Read public on the bucket
S3 will show warning when we do this change, but we need public read for our website.
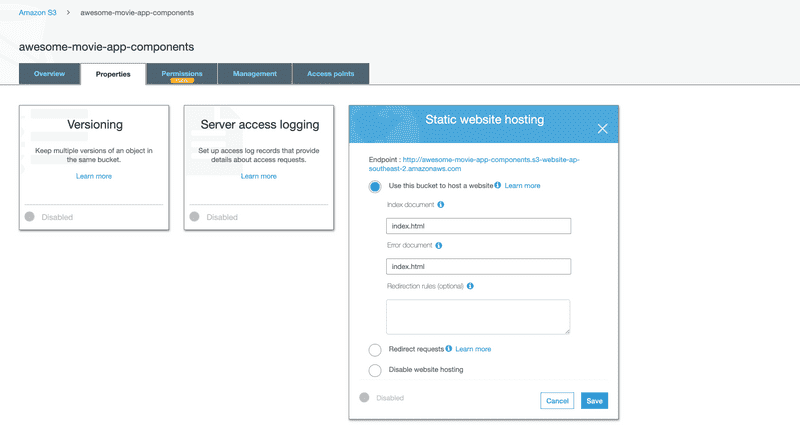
Enable Static Website hosting for S3 bucket
Create a test index.html
Lets create a test index.html file.
<!DOCTYPE html>
<html lang="en">
  <head>
    <meta charset="utf-8" />
    <meta http-equiv="x-ua-compatible" content="ie=edge" />
    <meta name="viewport" content="width=device-width, initial-scale=1" />
    <title>S3 Temp File</title>
  </head>
  <body>
    <h1>This is a temp file</h1>
  </body>
</html>
Uploading the index.html
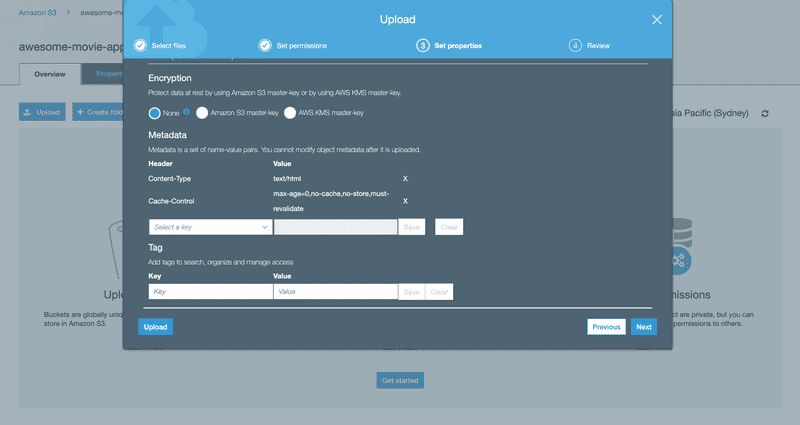
Couple of things to note here. We need to set the Content-Type to text/html otherwise S3 will default to binary and we will see gibberish on the browser.
And very important thing, we need to make sure browser never caches our index.html. Hence we need to set the Cache-Control header correctly.
Testing our S3 website
If everything went well, you should be seeing this on our browser.
Setting up Cloudfront
With S3 Bucket setup, next thing we want to do is setup our CDN. We will use Cloudfront for our CDN.
Why do we need a CDN
We can work directly with our S3 Bucket, but it is always good to serve your content through CDN. Not only CDN makes the content delivery faster, it also adds an added layer of security.
Creating Cloudfront Distribution
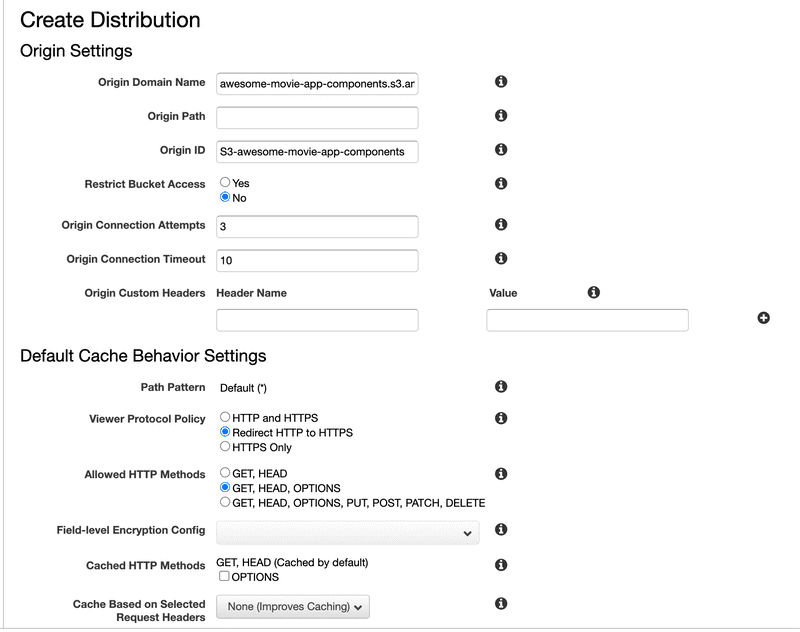
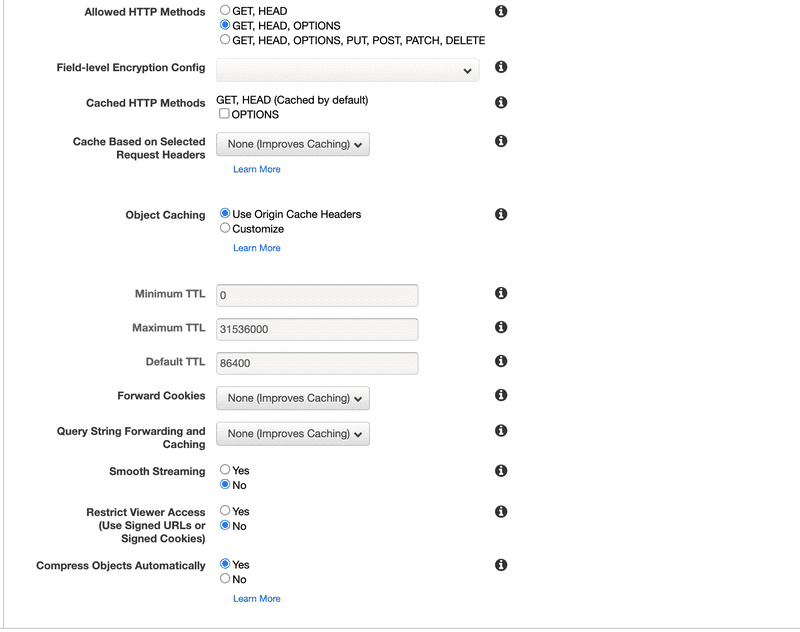
We will be creating a standard Cloudfront Distribution with S3 origin. We will redirect all our traffic to https and will respect origin headers.
Adding rules for React Router
As we are using React Router for routing, we want all our requests to be handled by index.html. So even if a user refreshes the page with some route, we want to tell Cloudfront to redirect them back to index.html and not throw errors.
We do this by adding custom error rules.
Verifying the changes
Once we have setup the distribution, it will take some time to deploy. And even when it is deployed, if we try hitting the endpoint we may get weird errors.
This is expected behavior as it takes time for the change to get propagated across all the Edges. Ideally wait for at least 20 minutes after deploying to verify the distribution.
Why no custom domain
If you want, you can add a CNAME to the distribution. But if we choose to do that, we need to upload our own certificates or in case you are using Route 53 for your DNS, you can use your AWS certificates. As I am not using Route 53 and my hosting is not on AWS, I have skipped this step.
If you want to add a CNAME, please check out the steps
Setting up Continous Integration
Now we have our Hosting sorted out, next step is to get our CI working.
CI Expectation
Before we even start to define our pipeline, we should first map the steps we want the CI to follow. This is a very important step as pipelines can get complicated and deciphering yaml files are not the easiest way to figure out what is happening.
We can write it like this,
Branch: master
Condition: When a Pull Request is created / updated
Exclusions: None
Tags: Any
Docker: Yes
Docker Image: unohomeloans/endcustomerportal:node12.8.1-chrome78-ff70-cypress-robot (Reusing an image which I created for running my pipelines)
Steps::
- Checkout Code
- List Files
- Sanity Check
node - Sanity Check
yarn - Pull Dependencies
- Build Components
- Build Storybook
- Build Core
- Build WebApp
- Run Components Tests
- Run Core Tests
- Archive Components Build Files
- Archive Storybook Build Files
- Archive Components Coverage
- Archive Core Build Files
- Archive Core Coverage
- Archive WebApp Build Files
This is a simple workflow. Complicated workflows can have multiple branches with parallel and sequential executions.
We will use Github Actions to configure our CI for Pull Requests.
We will create a .github folder at the root of our project and add pull-requests.yml file. Our CI steps converted will look something like this
name: Pull Requests
on:
  pull_request:
    branches:
      - master
jobs:
  build:
    name: Build and Test Pull Request
    # This job runs on Linux
    runs-on: ubuntu-latest
    container:
      image: unohomeloans/endcustomerportal:node12.8.1-chrome78-ff70-cypress-robot
    steps:
      - name: Checkout code
        uses: actions/checkout@v2
      - name: List files
        run: "ls -ltr"
      - name: Check Node Version
        run: "node --version"
      - name: Check Yarn Version
        run: "yarn --version"
      - name: Pull Dependencies
        run: "yarn"
      - name: Build Components
        run: |
          cd packages/components
          yarn build-js:prod
      - name: Build Storybook
        run: |
          cd packages/components
          yarn build:storybook
      - name: Build Core
        run: |
          cd packages/core
          yarn build-js:prod
      - name: Build WebApp
        env:
          API_URL: ${{ secrets.API_URL }}
          API_KEY: ${{ secrets.API_KEY }}
        run: |
          cd packages/webapp
          yarn build:webapp:prod
      - name: Run Components Tests
        run: |
          cd packages/components
          yarn test
      - name: Run Core Tests
        run: |
          cd packages/core
          yarn test
      - name: Archive Components Build Files
        uses: actions/upload-artifact@v1
        with:
          name: components
          path: packages/components/lib
      - name: Archive Storybook Build Files
        uses: actions/upload-artifact@v1
        with:
          name: storybook
          path: packages/components/dist
      - name: Archive Components Coverage
        uses: actions/upload-artifact@v1
        with:
          name: components-coverage
          path: packages/components/coverage
      - name: Archive Core Build Files
        uses: actions/upload-artifact@v1
        with:
          name: core
          path: packages/core/lib
      - name: Archive Core Coverage
        uses: actions/upload-artifact@v1
        with:
          name: core-coverage
          path: packages/core/coverage
      - name: Archive WebApp Build Files
        uses: actions/upload-artifact@v1
        with:
          name: webapp
          path: packages/webapp/dist
We are configuring our build environment variables using Github Secrets. Once the Secrets are setup, we can use it anywhere in our workflow. For more details check out their documentation.
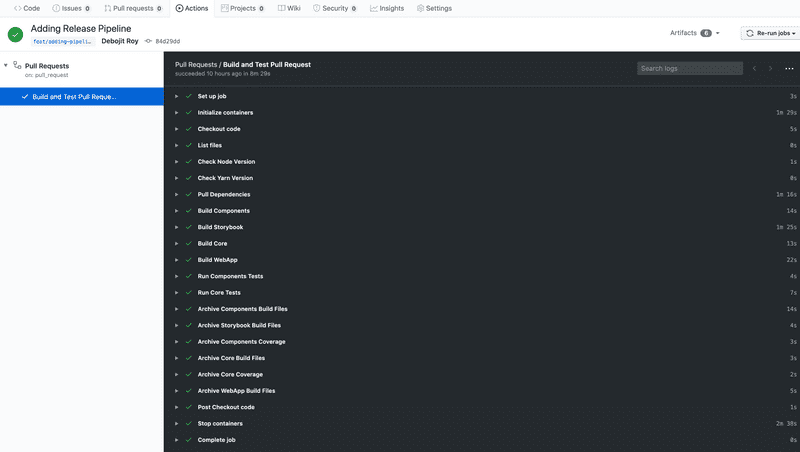
Once we have set this up and raise a Pull Request, Github will run this pipeline everytime someone updates the pull request. We can check out the run under Actions tab.
Setting up Continous Delivery
Now with Continous Integration (CI) we are confident that every changes will be tested and application build is working. Next step is Continous Delivery (CD).
As part of CD, we want to make sure everytime any approved change when merged to master, we would like to release our Component Library and Movie App.
Preparing the Deployment script
After the build is done, we would like to upload the files to S3 Bucket and Invalidate our Cloudfront Distribution Cache. Also I don’t want the browser to cache my index.html and I would like the browser to cache all my other files for longer time as they are content hashed.
We can use any of the available NPM packages for this purpose, but I prefer using AWS CLI for the purpose. I have bundled aws cli in my docker image so I don’t have to download it for every run.
So we create deployApp.sh
#!/usr/bin/env bash
# Usage deployApp.sh <folder> <bucket_name> <cloudfront_id>
deploy_folder="$1"
s3_bucket_name="$2"
cloudfront_dist_id="$3"

echo "Deploying app...";

if [ ! $deploy_folder ]; then
echo "Deployment folder cannot be empty."
echo "Usage: deployApp.sh <folder> <bucket_name> <cloudfront_id>"
exit 2;
fi

if [ ! $s3_bucket_name ]; then
echo "S3 Bucket Name cannot be empty."
echo "Usage: deployApp.sh <folder> <bucket_name> <cloudfront_id>"
exit 2;
fi

if [ ! $cloudfront_dist_id ]; then
echo "Cloudfrint Distribution Id cannot be empty."
echo "Usage: deployApp.sh <folder> <bucket_name> <cloudfront_id>"
exit 2;
fi


# Upload all files except index.html to S3 Bucket
# Add 1 year cache as everything is content hashed
aws s3 sync $deploy_folder s3://$s3_bucket_name/ \
  --cache-control max-age=31556952 \
  --acl public-read \
  --exclude index.html

# Upload index.html with no-cache
aws s3 cp $deploy_folder/index.html s3://$s3_bucket_name/index.html \
  --metadata-directive REPLACE \
  --cache-control max-age=0,no-cache,no-store,must-revalidate \
  --content-type text/html \
  --acl public-read

# Invalidate Cloudfront Distribution
aws cloudfront create-invalidation \
  --distribution-id $cloudfront_dist_id \
  --paths /*


echo "Finished deploying app...";
Important note regarding AWS Credentials
For the release workflow, we will need to set AWS_ACCESS_KEY_ID and AWS_SECRET_ACCESS_KEY in Secrets. Easiest way to set this up is to copy your Admin user credentials and paste them. But I would suggest strongly NOT to do it.
I would suggest creating separate users with limited access to only the required S3 Buckets and Cloudfront distributions for the application. I would even recommend not reusing users across applications.
Though it adds an overhead, it is a better approach to minimize the risk of misuse of credentials. Also AWS makes it easy for setting up roles and access by making it declarative using the UI wizard.
Defining Release Workflow
The steps for release is pretty much the same with one addition of calling deploy script.
We create release.yml and add it to the .github folder.
name: Release
on:
  push:
    branches:
      - master
jobs:
  build:
    name: Build, Test, Release Movie App
    # This job runs on Linux
    runs-on: ubuntu-latest
    container:
      image: unohomeloans/endcustomerportal:node12.8.1-chrome78-ff70-cypress-robot
    steps:
      - name: Checkout code
        uses: actions/checkout@v2
      - name: List files
        run: "ls -ltr"
      - name: Check Node Version
        run: "node --version"
      - name: Check Yarn Version
        run: "yarn --version"
      - name: Pull Dependencies
        run: "yarn"
      - name: Build Components
        run: |
          cd packages/components
          yarn build-js:prod
      - name: Build Storybook
        run: |
          cd packages/components
          yarn build:storybook
      - name: Build Core
        run: |
          cd packages/core
          yarn build-js:prod
      - name: Build WebApp
        env:
          API_URL: ${{ secrets.API_URL }}
          API_KEY: ${{ secrets.API_KEY }}
        run: |
          cd packages/webapp
          yarn build:webapp:prod
      - name: Run Components Tests
        run: |
          cd packages/components
          yarn test
      - name: Run Core Tests
        run: |
          cd packages/core
          yarn test
      - name: Deploy Storybook
        env:
          AWS_ACCESS_KEY_ID: ${{ secrets.AWS_ACCESS_KEY_ID }}
          AWS_SECRET_ACCESS_KEY: ${{ secrets.AWS_SECRET_ACCESS_KEY }}
        run: |
          cd packages/components
          yarn deploy:storybook
      - name: Deploy WebApp
        env:
          AWS_ACCESS_KEY_ID: ${{ secrets.AWS_ACCESS_KEY_ID }}
          AWS_SECRET_ACCESS_KEY: ${{ secrets.AWS_SECRET_ACCESS_KEY }}
        run: |
          cd packages/webapp
          yarn deploy:webapp
      - name: Archive Components Build Files
        uses: actions/upload-artifact@v1
        with:
          name: components
          path: packages/components/lib
      - name: Archive Storybook Build Files
        uses: actions/upload-artifact@v1
        with:
          name: storybook
          path: packages/components/dist
      - name: Archive Components Coverage
        uses: actions/upload-artifact@v1
        with:
          name: components-coverage
          path: packages/components/coverage
      - name: Archive Core Build Files
        uses: actions/upload-artifact@v1
        with:
          name: core
          path: packages/core/lib
      - name: Archive Core Coverage
        uses: actions/upload-artifact@v1
        with:
          name: core-coverage
          path: packages/core/coverage
      - name: Archive WebApp Build Files
        uses: actions/upload-artifact@v1
        with:
          name: webapp
          path: packages/webapp/dist
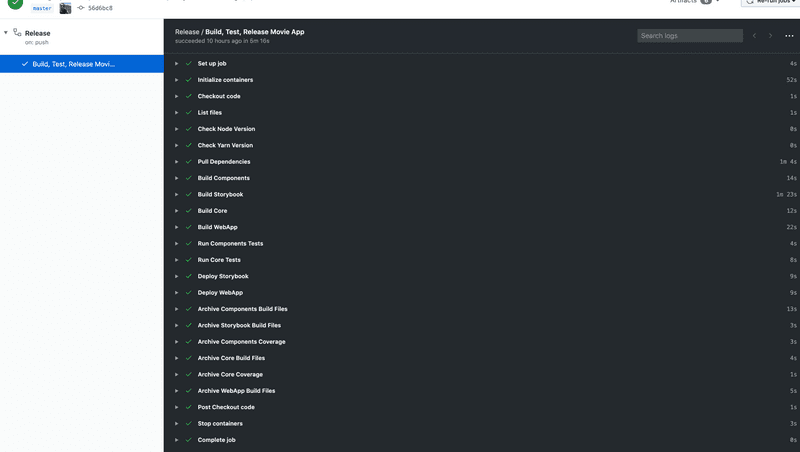
Now whenever a Pull Request is merged, Github will make sure that the Release Pipeline is run.
Checking everything works fine
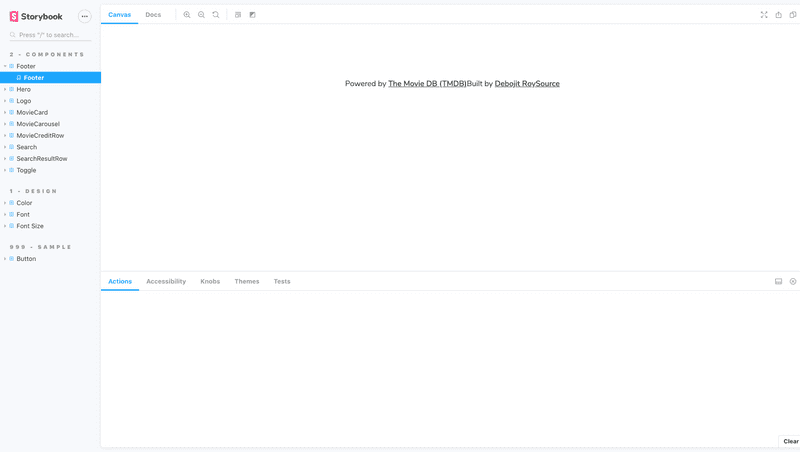
If everything went well, we should be able to access our websites.
That was one long post !!! I hope next time you have an idea you will be able to easily take it from an idea to production.
If you have any doubts or just want to say hello, feel free to drop me a note on hello@debojitroy.com

